Tutorial
This tutorial will step you through the process of creating your first Molybden application.
Overview
In this tutorial you will generate a new Molybden project, install dependencies, overview the project structure, learn how to work with the application backend and frontend, how the backend and frontend communicate with each other, customize the application window and context menu, replace the app icon, and pack the application into a native executable for further distribution.
Prerequisites
- Windows 10 or later.
- Install Node.js version 20.11.0 or higher.
- Install Microsoft C++ Build Tools. Make sure to select the “Desktop development with C++” workload during installation.
- macOS Sonoma 14 or later.
- Install Node.js version 20.11.0 or higher.
- Install Command Line Tools.
- Ubuntu 22.04 64-bit or later.
- Install Node.js version 20.11.0 or higher.
- Install GCC or Clang that supports C++20 or later:
sudo apt install gcc
Generating a project
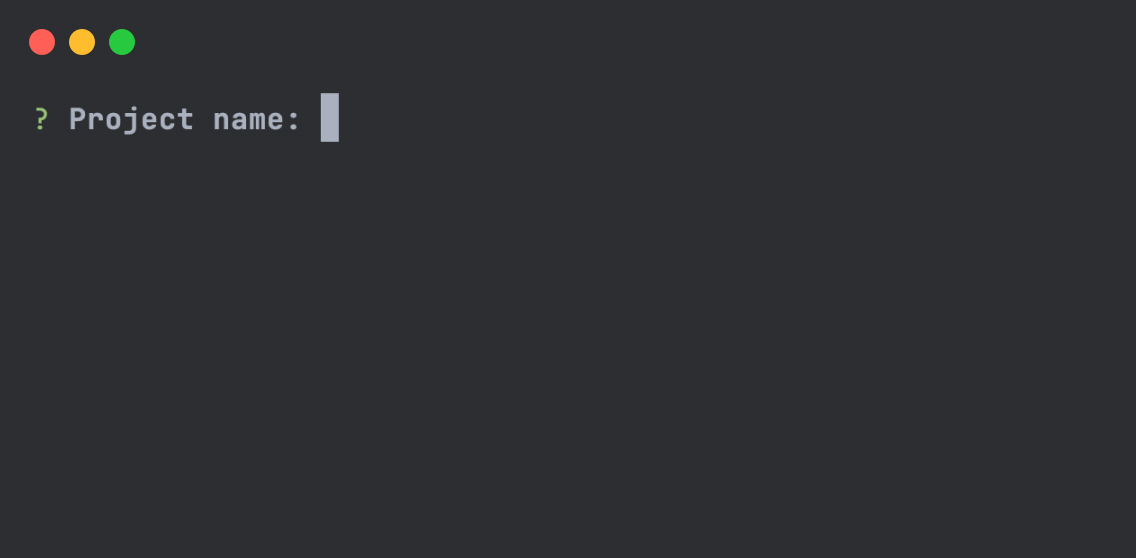
Make sure your current working directory is the one where you intend to create a project. Run the following command in your command line:
npm create molybden-app@latest
This command will install and execute Create Molybden App, the official Molybden project scaffolding tool.
When prompted, provide the following project name, frontend framework, UI component library, and language:
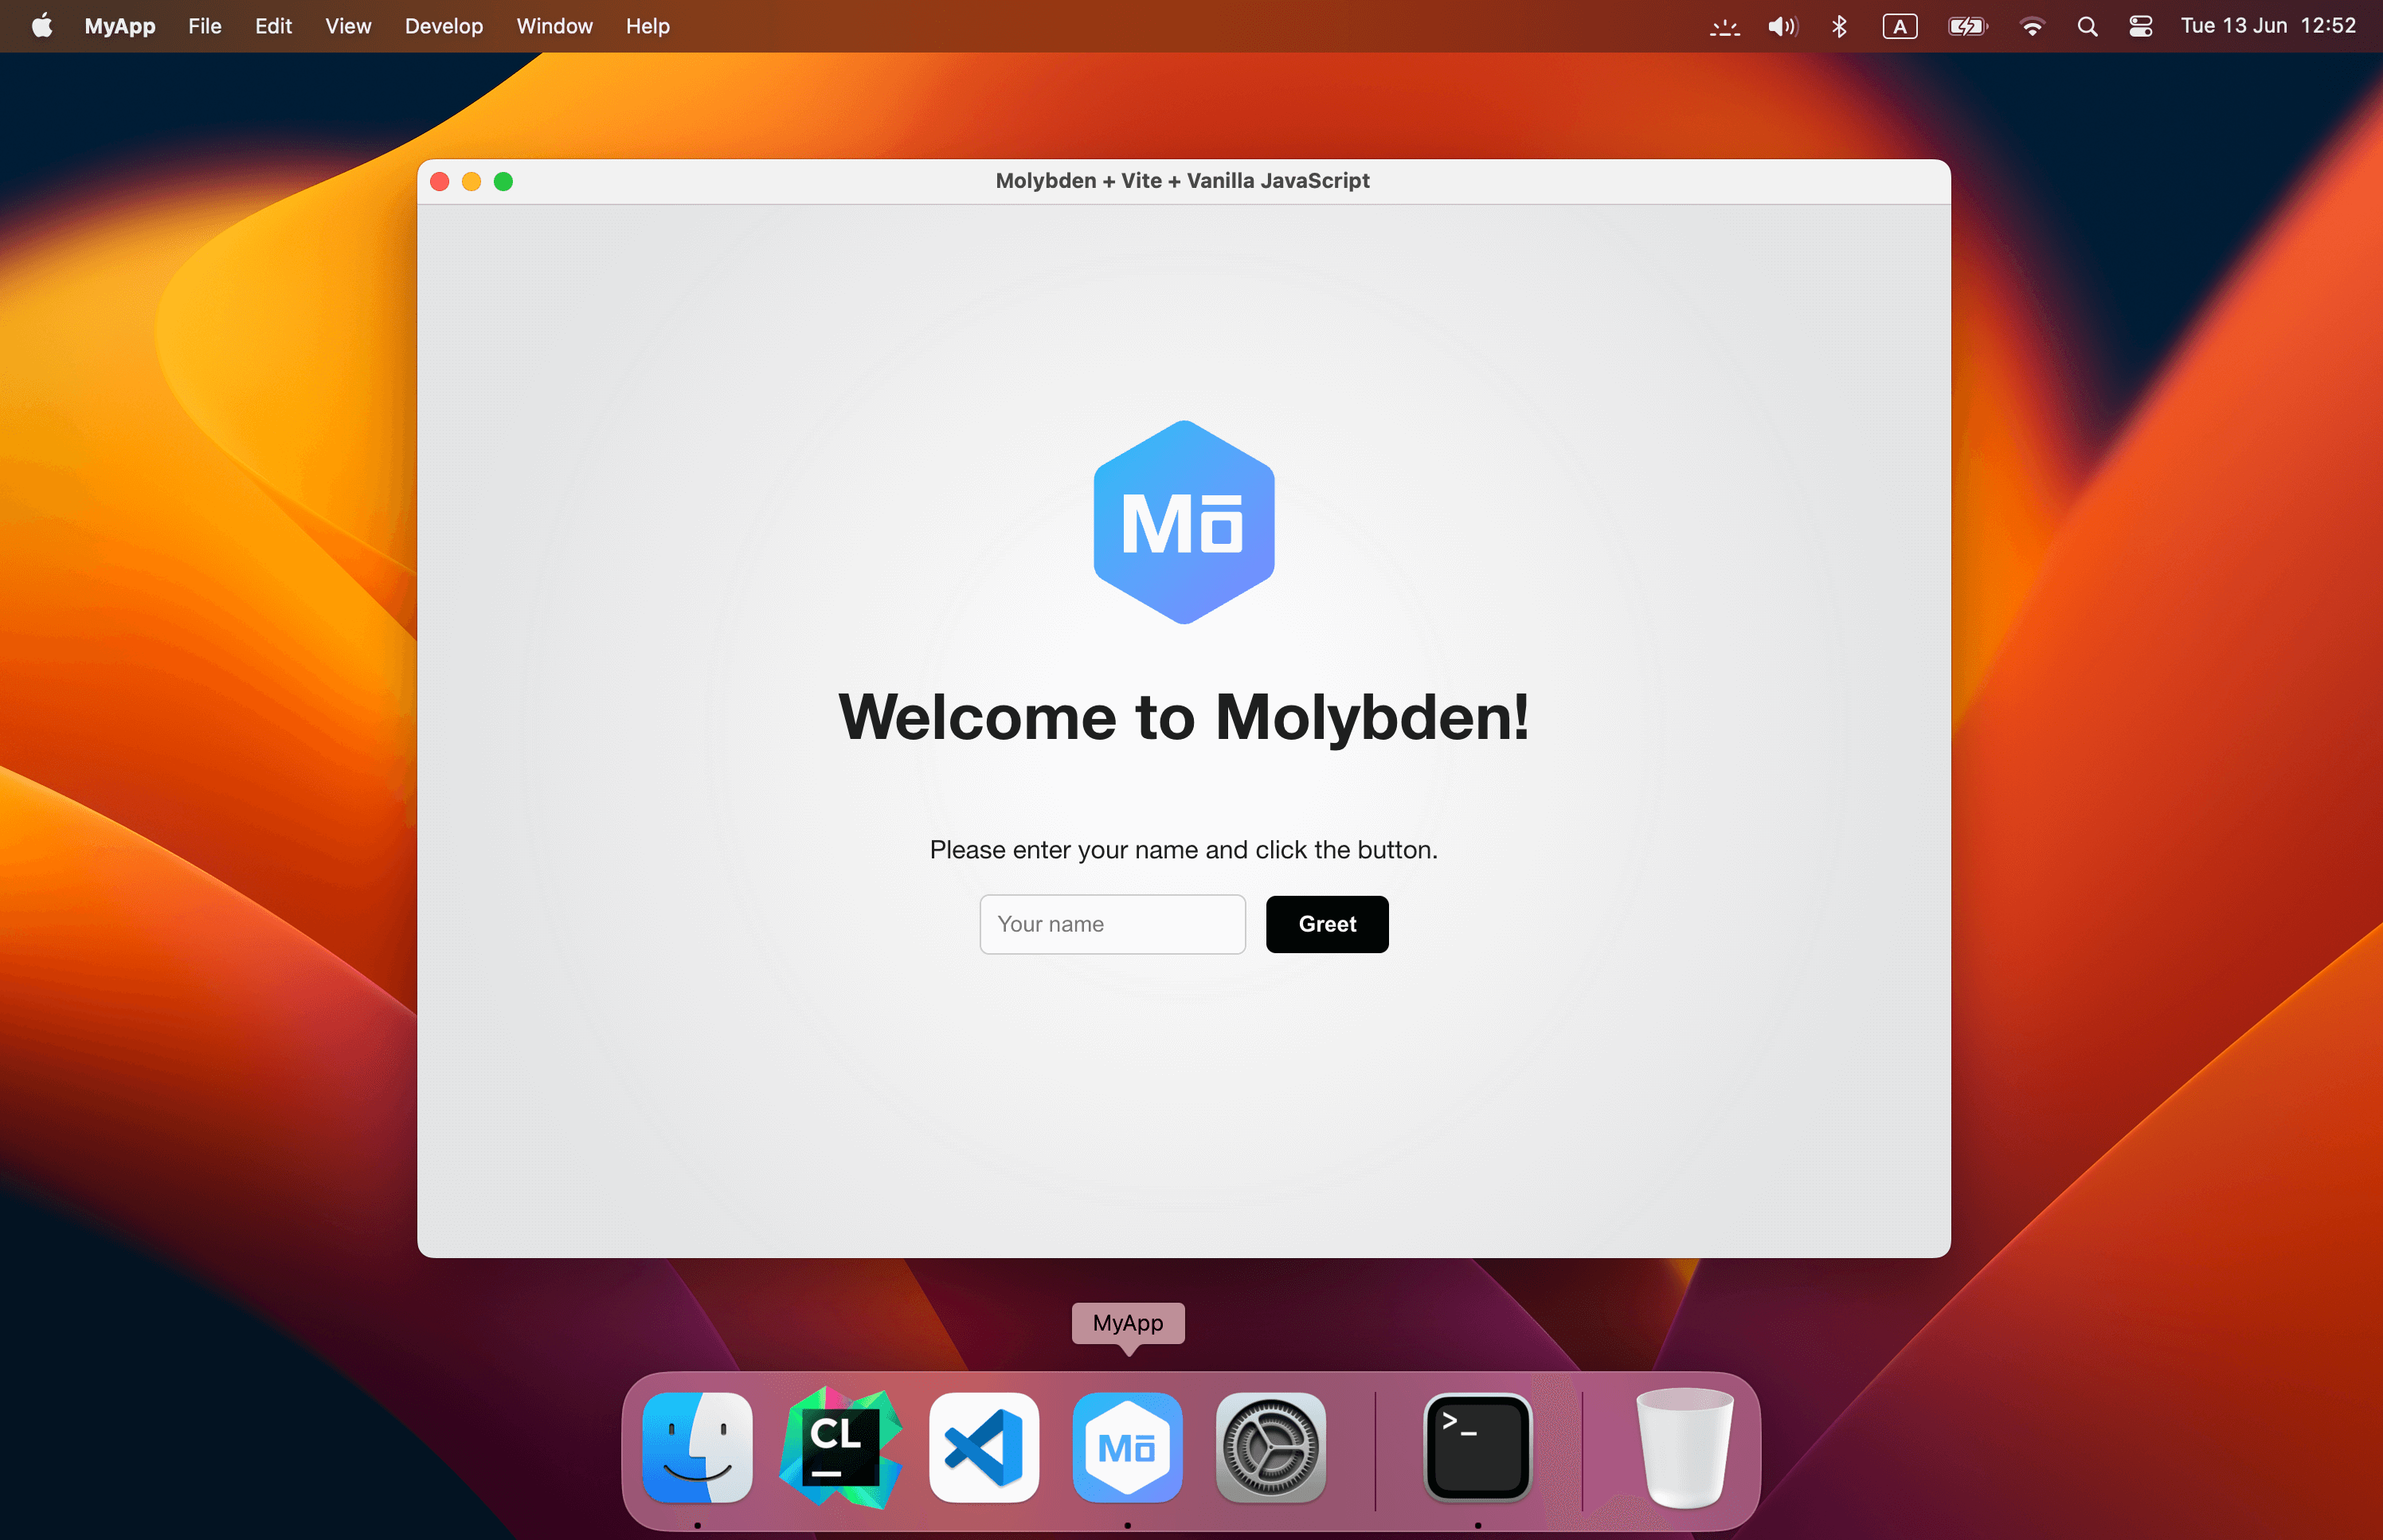
Once the project is created, follow the instructions to install dependencies and run your first Molybden app in development mode:
cd MyApp
npm install
npm run molybden dev
You should now have your first Molybden app running!
Project overview
The project directory structure may be different depending on the frontend framework and language you
chose. In this tutorial we selected the Vanilla frontend and the JavaScript language for the app frontend.
Here’s the project directory structure for the generated project:
src/
|-- assets/
|-- main.js
`-- style.css
src-cpp/
|-- assets/
|-- resources/
|-- src/
|   `-- main.cc
CMakeLists.txt
index.html
molybden.conf.json
package.json
The project directory consists of files that can be divided into three categories:
- Configuration files.
- Application frontend files.
- Application backend files.
The application frontend is responsible for creating the application user interface that will be displayed in the application window and communicating with the application C++ backend.
The application backend is responsible for creating the application window, displaying native system dialogs, managing the application life cycle, making calls to the operating system and third party libraries, and communicating with the application JavaScript frontend.
Calling C++ from JavaScript
You can inject C++ functions/objects/properties into JavaScript and work with them as if they were JavaScript functions/objects/properties. The function arguments and return value are automatically converted between C++ and JavaScript types.
Let’s see how the application C++ backend and JavaScript frontend communicate with each other in the generated project.
In the src-cpp/src/main.cc file we inject the greet() C++ function into JavaScript:
#include "molybden.hpp"

using namespace molybden;

std::string greet(std::string name) {
  return "Hello " + name + "! This message comes from C++";
}

void launch() {
  App::init([](std::shared_ptr<App> app) {
    auto browser = Browser::create(app);
    browser->onInjectJs = [](const InjectJsArgs& args, InjectJsAction action) {
      args.window->putProperty("greet", greet);
      action.proceed();
    };
    browser->loadUrl(app->baseUrl());
    browser->show();
  });
}
In the index.html file we define the “Greet” button and include the src/main.js file:
<!DOCTYPE html>
<html lang="en">
<head>
<link rel="stylesheet" href="src/style.css"/>
<title>Molybden + Vite + Vanilla JavaScript</title>
</head>
<body>
<div class="container">
<div class="row">
<img src="src/assets/logo.svg" class="logo" alt="Molybden logo"/>
</div>
<h1>Welcome to Molybden!</h1>
<p>Please enter your name and click the button.</p>
<div class="row">
<div>
<input id="greet-input" placeholder="Your name"/>
<button id="greet-btn" type="button">Greet</button>
</div>
</div>
<p id="greet-msg"></p>
<script type="module" src="src/main.js"></script>
</div>
</body>
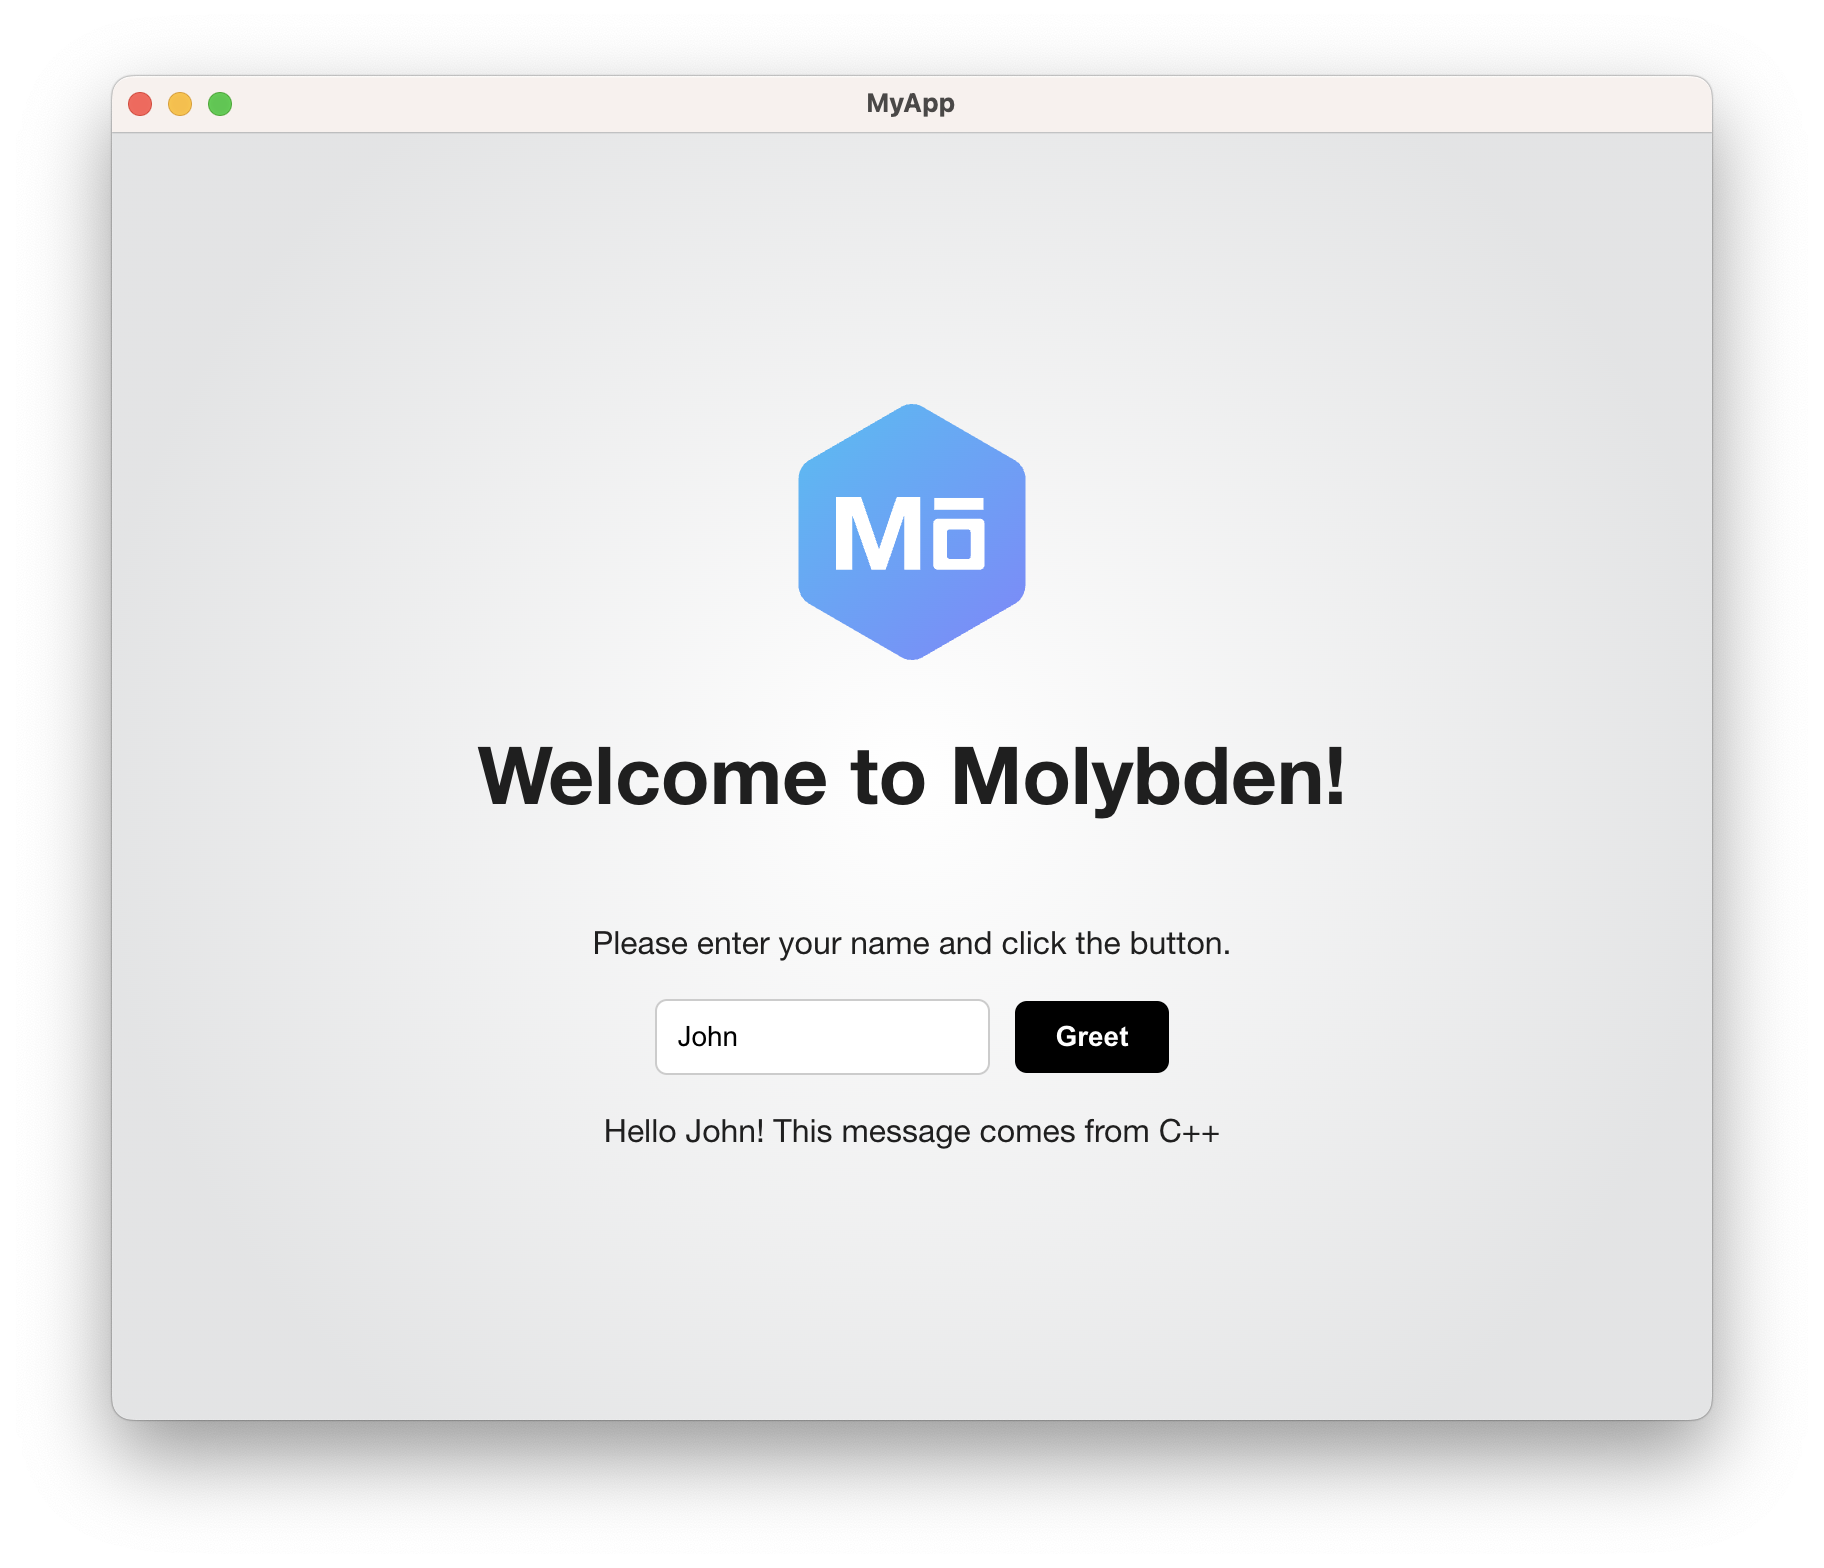
</html>In the src/main.js file we define the sayHello() function that will be called when the “Greet” button is clicked:
function sayHello() {
  let name = document.querySelector("#greet-input").value;
  document.querySelector("#greet-msg").textContent = greet(name);
}

document.querySelector("#greet-btn").addEventListener("click", sayHello);
In the sayHello() function we read the name from the input field, calls the injected greet() C++ function and prints
its return value:
function sayHello() {
  let name = document.querySelector("#greet-input").value;
  document.querySelector("#greet-msg").textContent = greet(name);
}
As you can see, the JavaScript String type is automatically converted to the C++ std::string
type and vice versa.
If you run the app, enter your name and click the “Greet” button, you will see the following:
Adding features
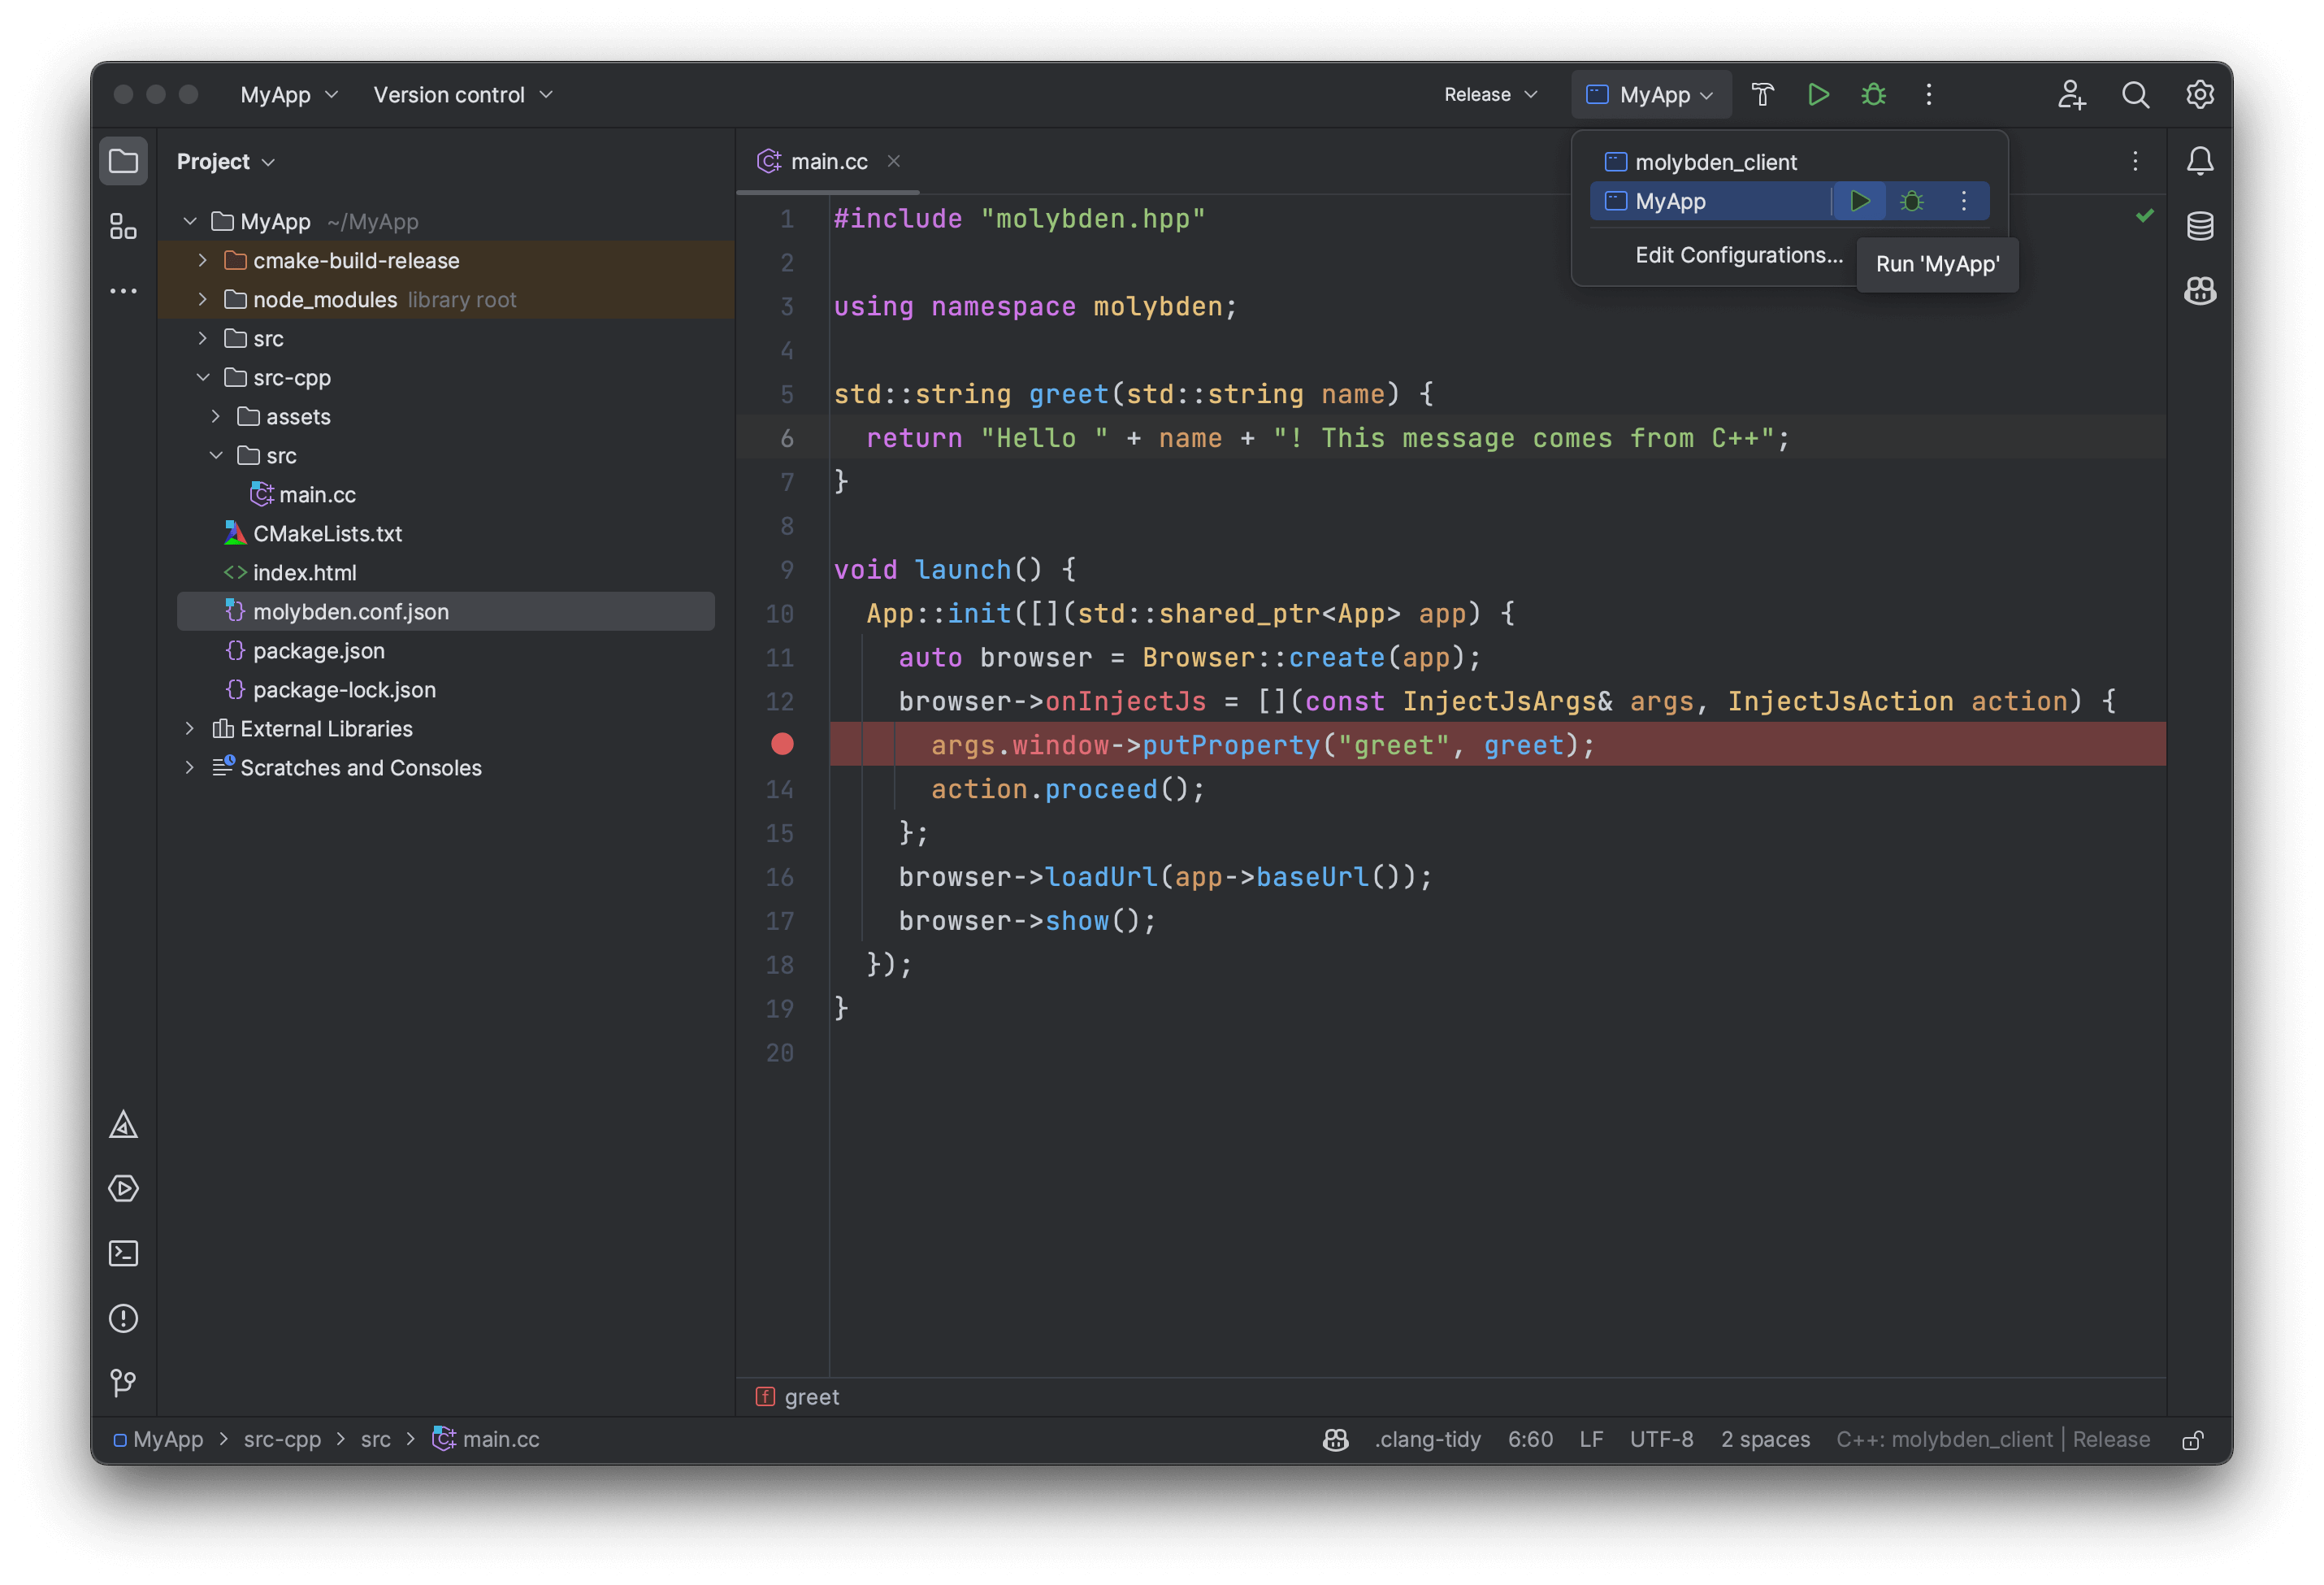
Let’s extend the application with the features you would probably need.
In this tutorial we will be adding features to the application backend. The application backend is written in C++. So we
recommend that you open the generated CMakeList.txt in your favorite
C++ IDE such
as MS Visual Studio, CLion,
or Qt Creator, and use it to develop and debug the application backend.
You can run and debug Molybden app right from your IDE:
Customizing window
Let’s customize the app window by setting its title to MyApp, setting its size to 800x600, and center the
window on the screen before showing it. For that, open the src-cpp/src/main.cc file and add the following code:
#include "molybden.hpp"

using namespace molybden;

std::string greet(std::string name) {
  return "Hello " + name + "! This message comes from C++";
}

void launch() {
  App::init([](std::shared_ptr<App> app) {
    auto browser = Browser::create(app);
    browser->onInjectJs = [](const InjectJsArgs& args, InjectJsAction action) {
      args.window->putProperty("greet", greet);
      action.proceed();
    };
    browser->loadUrl(app->baseUrl());

    // Customize the browser window title, size, and position.
    browser->setTitle("MyApp");
    browser->setSize(800, 600);
    browser->centerWindow();

    browser->show();
  });
}
Configuring app menu
On macOS the app must have a main menu. By default, each Molybden app has a predefined main menu. You can customize the app main menu with both the standard and custom menu items.
Let’s configure the app main menu by adding the following code to the src-cpp/src/main.cc file:
#include "molybden.hpp"

using namespace molybden;

std::string greet(std::string name) {
  return "Hello " + name + "! This message comes from C++";
}

void launch() {
  App::init([](std::shared_ptr<App> app) {
    auto browser = Browser::create(app);
    browser->onInjectJs = [](const InjectJsArgs& args, InjectJsAction action) {
      args.window->putProperty("greet", greet);
      action.proceed();
    };
    browser->loadUrl(app->baseUrl());

    // Customize the browser window title, size, and position.
    browser->setTitle("MyApp");
    browser->setSize(800, 600);
    browser->centerWindow();

    // Configure the app main menu.
    app->setMainMenu(CustomMenu::create({
        menu::MacApp({
            menu::MacHideApp(),
            menu::MacHideOthers(),
            menu::MacShowAll(),
            menu::Separator(),
            menu::Quit()
        }),
        menu::File({
            menu::CloseWindow()
        }),
        menu::Edit({
            menu::Undo(),
            menu::Redo(),
            menu::Separator(),
            menu::Cut(),
            menu::Copy(),
            menu::Paste(),
            menu::Delete(),
            menu::SelectAll(),
        }),
        menu::View({
            menu::DevTools()
        })
    }));

    browser->show();
  });
}
The app main menu will look like this:

Configuring context menu
By default, the context menu is not enabled. You can enable the context menu and customize it with
both the standard and custom menu items in the Browser::onShowContextMenu delegate.
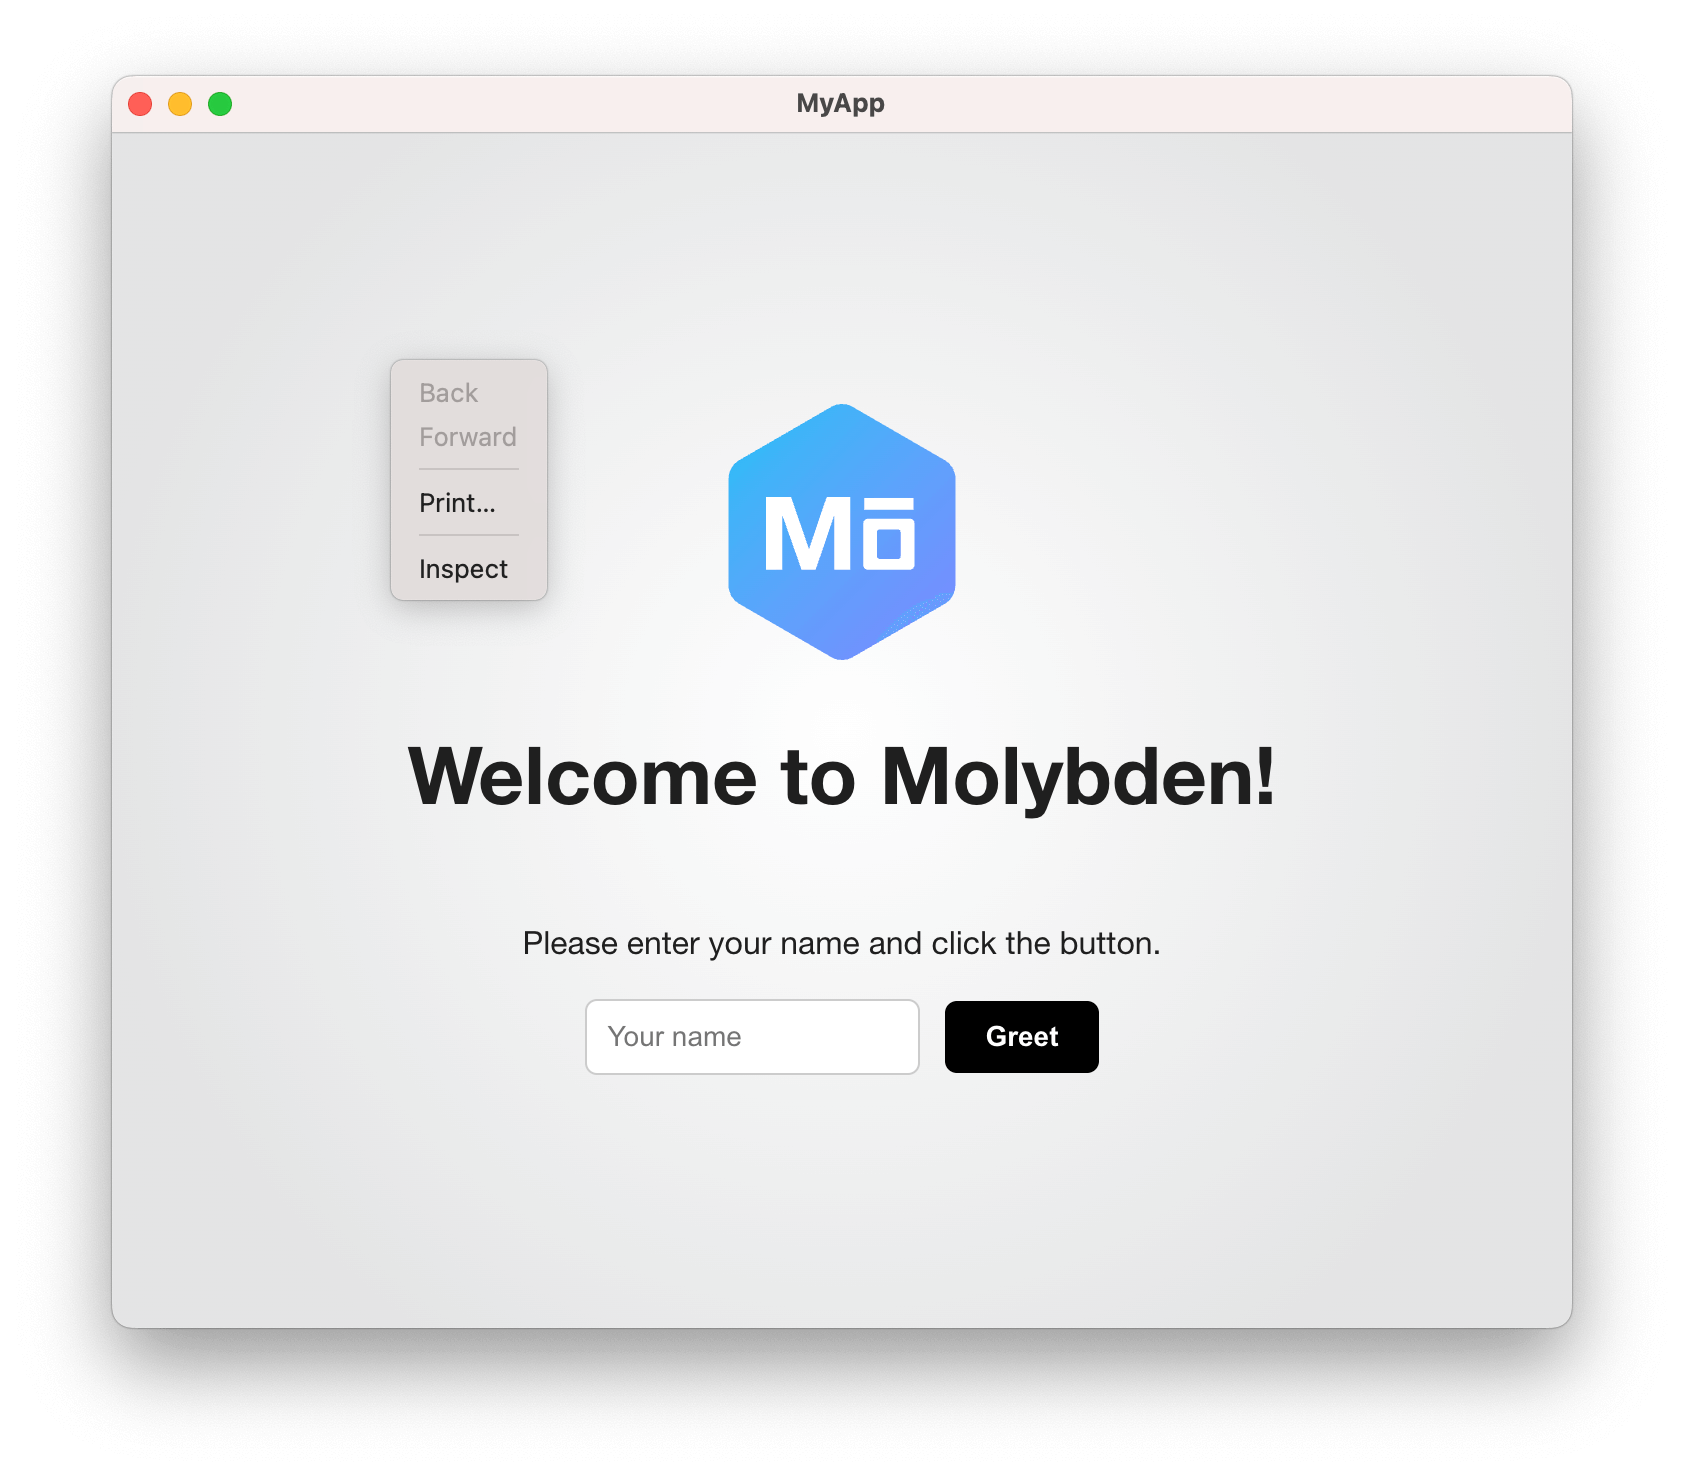
Let’s add the context menu with a few standard items to the browser window:
#include "molybden.hpp"

using namespace molybden;

std::string greet(std::string name) {
  return "Hello " + name + "! This message comes from C++";
}

void launch() {
  App::init([](std::shared_ptr<App> app) {
    auto browser = Browser::create(app);
    browser->addJavaScriptProperty("greet", greet);
    browser->loadUrl(app->baseUrl());

    // Customize the browser window title, size, and position.
    browser->setTitle("MyApp");
    browser->setSize(800, 600);
    browser->centerWindow();

    // Configure the app main menu.
    app->setMainMenu(CustomMenu::create({
        menu::MacApp({
            menu::MacHideApp(),
            menu::MacHideOthers(),
            menu::MacShowAll(),
            menu::Separator(),
            menu::Quit()
        }),
        menu::File({
            menu::CloseWindow(),
        }),
        menu::Edit({
            menu::Undo(),
            menu::Redo(),
            menu::Separator(),
            menu::Cut(),
            menu::Copy(),
            menu::Paste(),
            menu::Delete(),
            menu::SelectAll(),
        }),
        menu::View({
            menu::DevTools()
        }),
        menu::Window({})
    }));

    // Configure the context menu.
    browser->onShowContextMenu = [](const ShowContextMenuArgs& args,
                                    ShowContextMenuAction action) {
      action.show(context_menu::Menu({
          context_menu::GoBack(),
          context_menu::GoForward(),
          context_menu::Separator(),
          context_menu::Print(),
          context_menu::Separator(),
          context_menu::InspectElement(),
      }));
    };

    browser->show();
  });
}
When you right-click on the browser window, you should observe the following context menu:
Customizing app details
You can customize the application name, icon, description, copyright, version, etc. by editing the
corresponding properties in molybden.conf.json:
{
  "app": {
    "name": "MyApp",
    "version": {
      "major": "1",
      "minor": "0",
      "patch": "0"
    },
    "author": "MyCompany",
    "copyright": "MyCopyright",
    "description": "MyDescription",
    "bundle": {
      "macOS": {
        "icon": "src-cpp/assets/app.icns",
        "bundleID": "",
        "codesignIdentity": "",
        "codesignEntitlements": "",
        "teamID": "",
        "appleID": "",
        "password": ""
      },
      "Windows": {
        "icon": "src-cpp/assets/app.ico",
        "certFile": "",
        "certPassword": "",
        "digestAlgorithm": "",
        "timestampServerURL": ""
      },
      "Linux": {
        "icon": "src-cpp/assets/app128.png"
        }
    },
    "configurations": {
      ...
    }
  }
}
To change the app icon, just replace the existing platform-specific icon files with your own ones in the same format.
Check out the Branding Guide to learn more about customizing your app.
Packaging the app for distribution
When you are ready to ship your app to production, run the following:
npm run molybden build
This command will create a production-ready build of your application in a native executable
and place it in the project’s ./build-dist/bin directory. On macOS and Windows platforms, it will also create a native installer in the
./build-dist/pack directory.
Check out the Distribution guide to learn more about shipping your app to production.